
Painting your walls like a professional is often said to be an art form. With all of the preparation and painting techniques, painters need to follow in order to get the results they want out of their paint job, it can make even the most patient hobbyist wonder if they should hire a pro. However, if you’re still wondering how to paint your walls like a pro, there are some basic steps you should follow.
How Do You Paint Your Walls Like A Pro?

First Step: Planning
The first step of painting your walls like a pro is planning. This means that you need to take the time to measure your walls, plan how many colors you want to use, paint time, the type of paint that will be best for your project, and figure out how much paint you will need for your painting project. This planning stage will help avoid problems when it comes time to start painting.
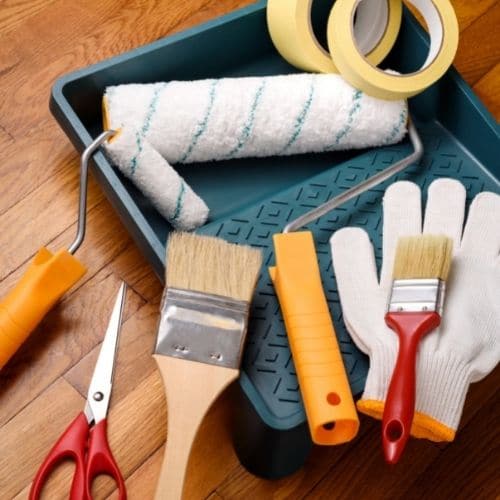
Second Step: Tools
In order to paint your walls like a pro, you will need the proper tools. This includes a ladder, a tape measure, painter’s tape, a paint roller, and a paintbrush, paint tray. you might need also an angled brush, a putty knife, and a damp cloth. Having these tools on hand will help make the painting process go much smoother. If you’re using a roller or brush, you’ll also need to decide the size of the brush or roller you’ll need.
Third Step: Pick your paint
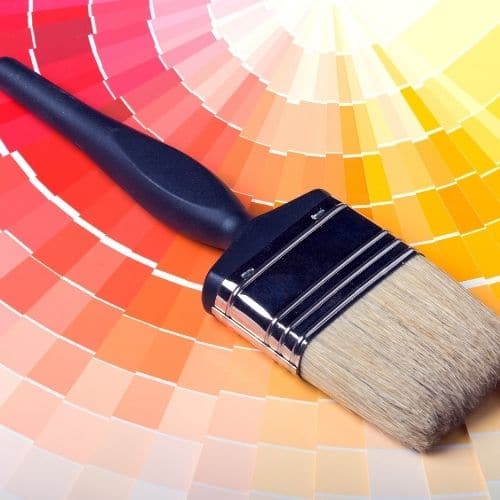
Pick a Color(s)
Now that you have planned your project and have all of the proper tools, it’s time to pick out your color(s). When deciding how to paint your walls like a pro, you should use an off-white or cream color. This will give you more of a dramatic look than if you had used a bolder color such as red or blue. If you have a small space, It also gives off the impression that the room is larger than it actually is.
Choose The Paint Finish:
There are several types of paint finishes and each one is designed to give a different look. Matte finishes provide the least amount of shine while high-gloss paints will be super shiny. If you’re looking for something that’s somewhere in between, mid-gloss is the way to go.
Consider Different Types Of Paint:
There are also different types of paint to choose from. Latex paint is water-based paint while oil-based paints are more durable but they also take longer to dry. If you’re looking for paint that will last, oil-based paints may be the way to go, but latex paints are easier to clean up if you make a mistake.
Sherwin Williams and Benjamin Moore have a great selection of professional paint.
Painting tip: before you buy a paint remember, eggshell, satin paint, and flat paint are best for interior walls, while semi-gloss and gloss paint is best for wood and trims.
Have A Painting Project?
Fourth Step: Preparation
This means that you need to clean your walls and make sure they are free of any debris or dust. If you skip this step, your paint may not stick to the wall properly and could end up looking uneven. You can follow these useful ideas:
- Prep the room by taking everything off of the wall. This includes pictures, nails, hooks, and any other items that aren’t meant to be painted.
- You should also move out furniture or cover it with plastic drop cloths. Don’t forget to remove window coverings, including blinds and curtains. Lastly, remove switch plates and outlet covers if you are painting around them.
- Next, if your walls are in poor condition, consider making repairs. For example, repairing cracks and holes is a good idea before painting since they could expand the longer you’re working with them.
- Sand down any glossy spots or imperfections with fine-grit sandpaper.
- Use painter’s tape to mask off any areas you don’t want to be painted. This should include baseboards, switches, outlets, crown molding, and door frames.
- Finally, prime the walls to get rid of any existing paint color and cover up stains.
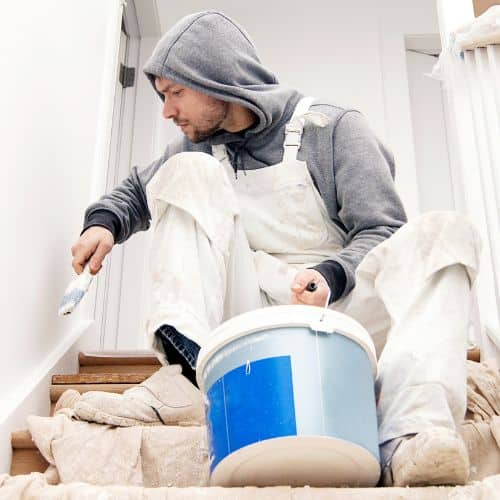
Fifth Step: Painting Walls
Now that your prep work is done, it’s time for the fun part – painting!
Painting Interior Walls:
Apply a base coat. This is the first layer of paint and should be applied in an even, thin layer to avoid leaving brush strokes. Make sure that you either use a paint sprayer or roll it on with a roller.
Next comes the second coat; this time it should be thicker than the first. You can either apply this thicker coat by rolling it on with a roller again or using a paint sprayer if you have one. Otherwise, you’ll need to do two coats by hand since no other method will give you as smooth of coverage as spraying or rolling from start to finish does.
Finally, after letting your second layer dry for about three hours, if needed, apply a third and final layer. This last layer should also be rolled on or sprayed on for the best results.
Allow the paint to dry completely, which could take up to 24 hours.
Now your walls should be freshly painted and look like they were done by a pro! Keep in mind that these steps may vary depending on the type of paint you are using and the condition of your walls. If you’re still feeling unsure about how to paint your walls like a pro, it may be best to consult with a professional painter.
Painting Exterior Walls:
Follow the same steps as if you were painting interior walls, but be sure to cover your windows and doors with plastic drop cloths before starting. This is especially important for exterior painting since rain and other elements could damage them. Then apply a durable primer to avoid having to repaint in the future. Allow this primer to dry completely before applying your final coat of paint. Finally, If you are leaving trim unpainted, let it dry for three hours or more before adding another layer of color.
Painting Window Frames and Trims:
If you’re painting your trim, door, and window frames, be sure to use a brush with bristles that are soft enough to avoid leaving streaks. Start by priming the trim and windows frame, then apply two coats of paint – letting the first one dry for at least three hours. To finish, add a third coat if needed. Let this final coat dry for 24 hours before reassembling anything you took apart earlier.
Now that you know how to paint your walls a pro by using these simple steps, you can go ahead and get started on your next project!
Excess Paint:
If you have excess paint, you can use it to touch up your walls later on. The first thing you should do is pour it into an empty gallon-sized water bottle. Next, label this container with a permanent marker and store it in a cool dry place.
Looking For Painters in Washington DC?
Sixth Step: Finishing Touches
Once the paint is completely dry, remove the painter’s tape, plastic sheeting, and then replace all of the items you removed from the wall and give the room a final cleaning. This includes vacuuming and dusting surfaces that were missed during prep.
Seventh step: Clean Your Tools
Once you’re finished painting, it’s important to clean your tools properly. This will help them last longer and be ready for the next project. To clean a roller, dip it in a bucket of soapy water and roll it back and forth until the paint is gone. You can also use a brush cleaner or turpentine to clean any stubborn paint from the bristles.
Make sure to use roller covers for your paint roller and to store your tools in a safe place where they won’t get damaged.
Now that you know how to paint your walls like a pro, you can go ahead and tackle your next painting project!
Important painting tips to keep in mind before starting a painting project:
- When it comes to DIY projects, always prioritize safety as their number one priority. This includes avoiding slippery surfaces as well as fumes and anything else that could cause harm.
- If possible, wait for warm and dry days to paint since humid weather can prolong drying time and damage the final result. Similarly, avoid windy days since airborne particles could get on your walls and ruin the finish.
- Make sure you have all of the necessary tools before starting a painting project. This includes a paint tray, a roller frame, and a wide or angled brush – depending on your project.
- Ventilation; it’s vital that you set up proper ventilation before starting any painting project. To do this, simply open your windows and doors and leave them open until the paint has dried completely.
- When it comes to painting tools, it’s best to use brushes with synthetic bristles since they’re more durable than natural ones. As for rollers, plastic ones are recommended over metal because they’re gentler on the walls themselves.
- Be sure to prepare your work area by covering everything that could get damaged during the process. This includes floors as well as furniture and window panes if necessary.
- If you’re using a roller and applying paint to larger surfaces, then it’s best that you load the paint on the outer end and not the middle. This will help avoid any messes while spreading out the paint at the same time.
- Once your painting project is complete, give yourself enough time to let everything dry before moving anything back into its original place. You should also store away any unused paint in case you need it for touch-ups later down the line.
- Perhaps one of the biggest painting tips we can offer is to purchase professional-grade paint whenever possible; this might be slightly more expensive than regular paint, but it doesn’t clog up your tools, dries much faster has a better consistency, and it can be cleaned off immediately with water without leaving any residue.
Are you looking for professional painters? We are the most preferred Handyman in DC, and we offer painting services in Washington DC and the surrounding area, such as Chevy Chase, Bethesda, Potomac, Rockville, Silver Spring, and all over Montgomery County. We are here to help make your project go as smoothly as possible. Contact us today to learn more!
We are here for you if you are looking for reliable and experienced DC handyman services! Please take advantage of our wide range of services that cover all aspects, such as repairs, installations, or new construction.
We offer competitive rates without hidden fees, so do not wait another minute; contact us today!


